git-well
How to git well
How to git well
GitHub is a code hosting platform for version control and collaboration. It’s designed around Git, a system for tracking changes in software code. It lets you and others work together on projects from anywhere. In this article, we’ll take a look at the key concepts of the GitHub development workflow for those in tech including working with repositories, branches, forks, commits, pull requests, and merging. Let’s get started!
What is version control?
Version control is a system that helps developers track and manage changes to a software projects’ code. As projects grow, the need for version control becomes vital — especially in a collaborative project. We can work safely by using what’s known as branching and merging.
Branching allows us to duplicate our source code (aka ‘the repository’), so we can safely make changes without affecting the entire project. Once the changes have been reviewed and approval is agreed upon, we merge our branch into the master to update our official code. If any bugs are identified— we have the option to revert back to our original code, as our changes have been tracked.
What is Git?
Git and Github are not synonymous! Git is a specific open-source version control system created by Linus Torvalds in 2005. It’s the program that actually tracks your changes, and ensures the entire code-base is available on each developer’s computer. GitHub however, is simply hosting your repositories (as well as providing some additional functionality).
The Fundamentals
Let’s get started! If you haven’t signed up for a GitHub account, go ahead and sign up here and you can also check out my personal GitHub right here as well (make sure to leave some stars on some cool repositories).
Creating a Repository
A GitHub repository (or “repo”) can be thought of as the root folder for your project. It contains all your project files and gives you the ability to access each file’s revision history. If you’re working in a team you can give other people access to your repository for project collaboration.
Let’s create our first repository! Make sure you’re signed in to GitHub, then:
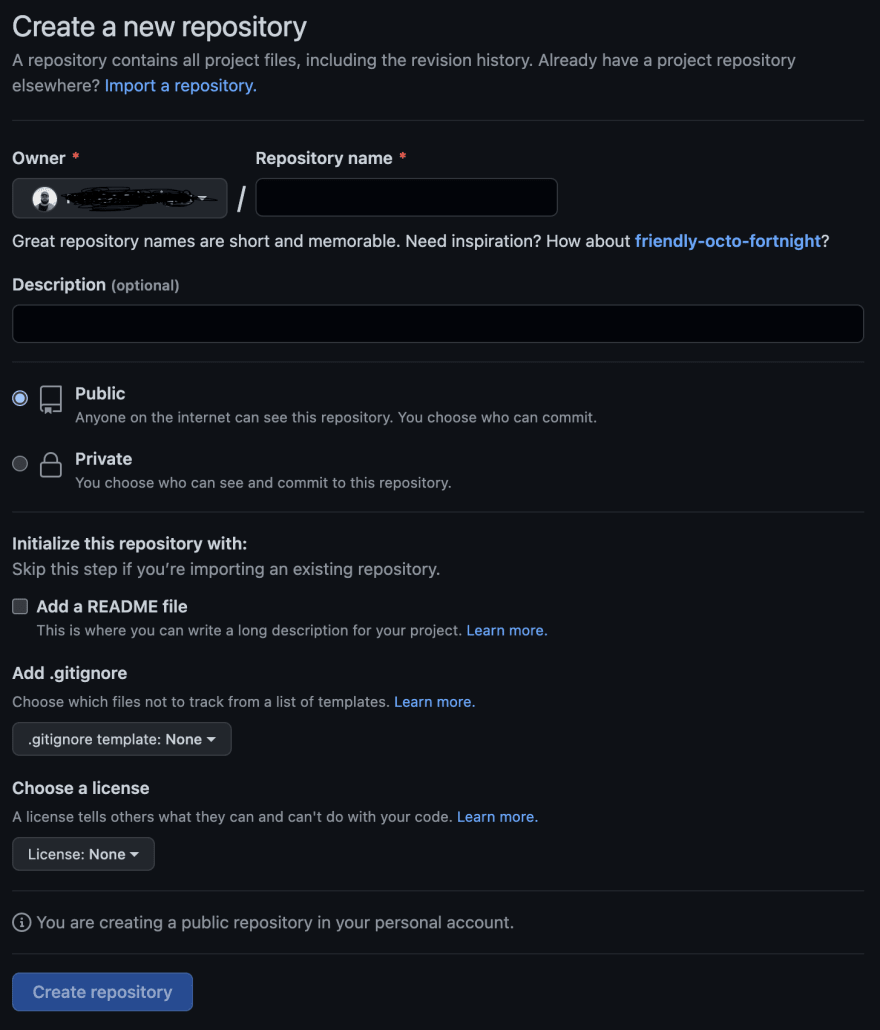
- In the upper-right corner, click the settings + icon & then New repository
- Give your repository a name
- Add a description if you like
- Choose between creating a public or private repository (either is fine)
- Select Initialize this repository with a README (eg. “My first repo!”)
- Click Create repository!
- Add files to your repository ~
~ We’re only testing so it really doesn’t matter what you add. Find an HTML file for example, and add it to your repository via the Upload files button.
Creating an Issue
Issues are how we track the tasks, enhancements, and bugs in our projects. They’re meant to be shared amongst your team to facilitate discussion for review as well as for managing task delegation. If you open an issue on a project managed by someone else, it’ll stay open until either you close it (for example if you figure out the problem) or if the repo owner closes it. When you create an issue, be sure to give a clear explanation of the task at hand. Let’s create an issue in our repository:
- In your repository, select the Issues tab
- Click the New Issue button
- Give your issue the title ‘Setup GitHub pages’
- Give a clear description e.g. ‘Need to setup GitHub Pages in this repository’
- Click Submit new issue
Assigning an Issue
We need to assign issues so our team members know who’s job it is to handle the task!
- On the right side of the screen, under the “Assignees” section, click the settings icon and select yourself
Let’s resolve our first issue! We want to setup GitHub pages. You can read about GitHub Pages here. But for now, our focus on completing the task:
- Click on the Settings tab in your repository
- Scroll down to the “GitHub Pages” section
- From the “Source” drop-down, select master branch
- Click Save
Closing an Issue
Now you’ve completed the task — you can go ahead and close it! You can delete an issue on GitHub, however closing it tells your team members that the task has been completed. To close:
- Open up your completed issue and click Close issue
The GitHub Flow
Now that we know how to work with issues, it’s time to look at the GitHub Flow. Simply put its a workflow where we can experiment with new ideas safely, without the risk of compromising our project. This is primarily achieved through the use of branching.

By default, our project lives on the master branch — any changes to the master will update directly to our project (This can be dangerous is you haven’t properly reviewed your changes!).
When we want to experiment with a new feature, or even fix an issue, we create a new branch on the project. The branch will initially be a duplicate of your master, now when you make changes —they’ll reflect only on the branch.
While working on changes, you’ll commit the changes to your branch. When you’re satisfied that the changes are complete, it’s time to open a pull request. From here your team will discuss and further refine the project changes. Once the changes have been approved, the branch will be merged onto the master branch. Let’s go through an example of this process now!
Creating a Branch
- Open your repository and click the Code tab
- Click
Branch: masterin the drop-down - In the field, enter a name for your branch (e.g. ‘development’)
- Click Create branch
Now that you’ve created a branch, you can modify your project without changing the deployed master branch.
A note on forks — A fork is different from a branch in that it allows you to clone another repo in your own account. It essentially allows you to start a new project based on a previous project.
Committing a file
Now we can safely work within our branch, let’s create a file and make our first commit.
- Make an edit (anything! just add a simple comment to your code) to one of the files you had added to the repository earlier
- Give the commit a name and description
- Make sure your newly created (development) branch is selected
- Click Commit changes
You’ve made your first commit! The next step is to share the changes with your team via a pull request.
Opening a Pull Request
A pull request is where we share our proposed project changes with our team — with the intent of discussing & revising them before applying the changes to the master branch.
- Open the Pull requests tab and click New pull request
- In the base: drop-down menu, ensure the master branch is selected
- In the compare: drop-down menu, select the development branch you created earlier
- Click Create pull request
- Now enter a title for your pull request, for example, “Add my changes”
- Add an accurate description of the changes you made
- Click Create pull request!
Your team members now have the ability to discuss and review your proposed changes. Once everyone is happy and the changes are approved— it’s time to merge to main.
Note: If you forked a repo and made changes, you can create a pull request to merge your changes from there as well.
Merging a Pull Request
- Inside of your Pull request, click Merge pull request
- Click Confirm merge
- Once your branch has been merged, you don’t need it anymore. You can click Delete branch!
Learn How To Push Code From VSCode To GitHub
Are you a developer consuming most of your time by switching between different windows to edit code, review changes, and push the code from VSCode to GitHub? Undoubtedly, every successful software project requires a version control system to facilitate the operation of various modules and versions by other teams.
In this blog, you will learn how to push the code from Visual Studio Code to Github. Before we get started, let me give a brief introduction to GitHub and Visual Studio.
GitHub is a website and cloud-based service that allows developers to store and manage their code and track and control changes to their code. With GitHub, multiple developers can simultaneously work on a project, reducing the risk of duplication or work conflicts and decreasing production time. GitHub allows developers to code, track changes, and innovate solutions to problems that may occur simultaneously during the site development process.
Visual Studio Code (VSCode) is a source code editor developed by Microsoft that can run on Windows, macOS, and Linux. It’s free, open-source, and has built-in support for debugging and Git version control, syntax highlights, snippets, and more. The VSCode user interface is highly customizable, as users can switch to different themes, keyboard shortcuts, and settings.
Steps To Push Code From VSCode To GitHub
Using GitHub with Visual Studio Code allows you to share your source code and collaborate with others. GitHub integration is provided via the GitHub Pull Requests and Issues extension. To push the code to GitHub from Visual Studio Code, you will need to create a GitHub account and install the “Github Pull Requests and Issues” extension.
Note: Before pushing the code from VSCode to GitHub, you need to ensure that all the files are in one folder, and you have to push your folder to Github.
Here are the steps to pushing code from VSCode to GitHub.
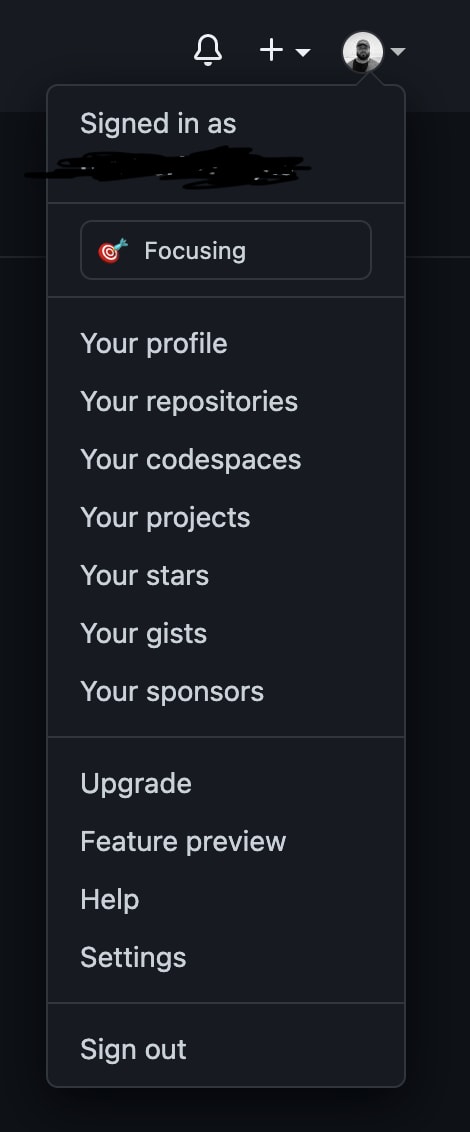
Step 1: Open your Github Account. And click on “Your Repository.”
Step 2: If you have an existing repository, then open that repository; otherwise, click on the “new” button to create a repository.

Step 3: Enter the name and description (optional) for the repository. Then check the private or public Repository box according to the requirement. Select the checkbox if you want to initialize the repository with a README.
Step 4: Click on “Create Repository.”
Step 5: Once the repository is created, Copy the repository’s web URL to push the code in the Github repository. We will use the Github repository URL later in VSCode.
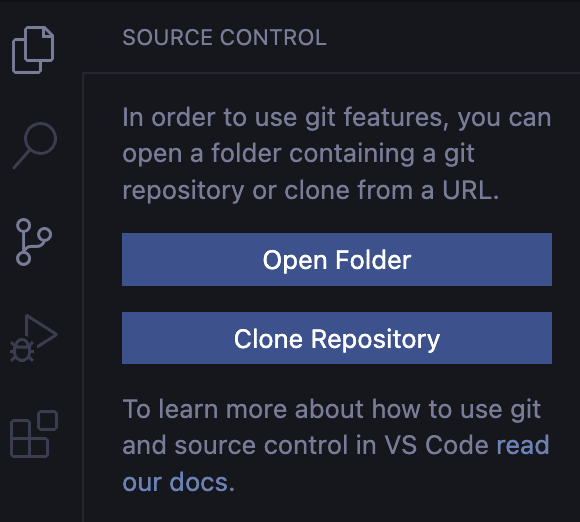
Step 6: Open VSCode and open the folder which you want to push. After that, click on the “Source Control icon” and click on “Initialize Repository.”
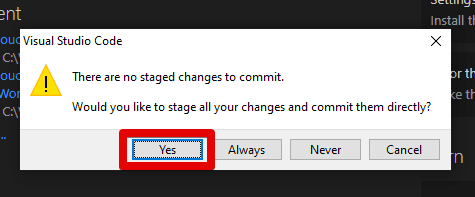
Step 7: Now give a commit message, press the “Ctrl + Enter” keyword, and then click on “Yes.” As you can see, it will start committing.
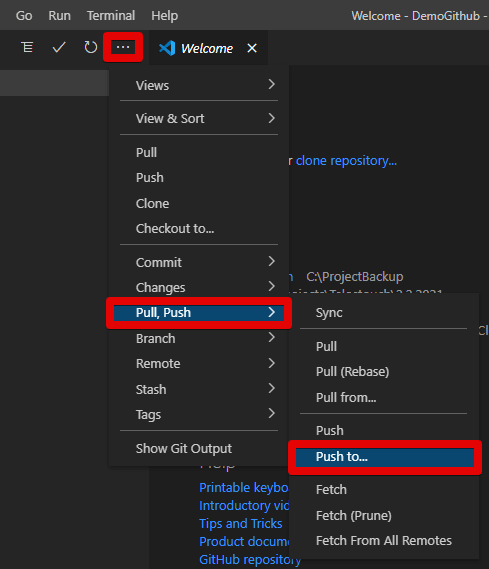
Step 8: Click on the “more icon,” then click on “Push to.” It will show you a message and click on “Add Remote” and paste the URL of that Github Repository and press “Enter.” Now, Enter the name of Remote and press “Enter.”
Step 9: Again, click on “Push To.” The URL will be shown in the selection area appended with the Remote name. Choose the URL that you have pasted and press “Enter.” After clicking on push, it’ll take some time to update the repository on Github.
Step 10: If you’re pushing the code for the first time, it will show you a popup to log in on Github. So Enter your Github account credentials and click on “log in.”
The code is now successfully delivered to Github from VSCode. To check if the project transferred successfully, go to the repository, and you can see all the data.
Contributors
@leogopal
